

.png)
.png)


Pricing is a critical aspect of any business, and a well-designed pricing module can greatly impact your revenue and customer acquisition.
In this extensive blog post, we will delve into the strategies, implementation techniques, and optimization tips to help you create a powerful pricing module that drives conversions and maximizes profits. Whether you're a startup or an established business, this guide will provide you with the knowledge and insights needed to build an effective pricing module that aligns with your business goals.
A pricing page typically includes the following elements:
Pricing Plans/Tiers: The different pricing options or tiers offered by the business, often categorized based on features, functionality, or usage limits. Each plan comes with a specific price and a set of included benefits.
Features and Benefits: A list of features and benefits associated with each pricing plan, highlighting what customers will receive in exchange for their investment. This helps customers understand the value proposition and compare the offerings of different plans.
Pricing Details: Clear and transparent information about the pricing structure, such as monthly or annual costs, any discounts or promotions, and additional fees or charges, if applicable.
Call-to-Action Buttons: Prominent buttons or links that encourage visitors to take action, such as "Get Started," "Sign Up Now," or "Choose Plan." These buttons typically lead to the checkout or signup process.
Comparison Table: A side-by-side comparison of the different pricing plans, highlighting the key differences in features, benefits, and pricing. This helps customers evaluate and choose the plan that best suits their needs.
Additional Information: Any supplementary information that may assist customers in their decision-making process, such as customer testimonials, case studies, FAQs, or a section explaining the business's refund or cancellation policy.
HubSpot's pricing page employs a clean and structured design. The page presents different pricing tiers in a tabular format, allowing users to easily compare features and prices. Each plan is accompanied by a clear description and highlights the benefits customers will receive. HubSpot also offers a free trial and provides links to additional resources.
The design and layout of a pricing page are essential in ensuring a seamless user experience and effectively communicating the value of the product or service. It should be visually appealing, easy to navigate, and provide clear pricing information to eliminate confusion and facilitate conversions.
A well-crafted pricing page helps potential customers understand the pricing options available, compare different plans, and make an informed purchasing decision, ultimately driving conversions and revenue for the business.

When it comes to designing a pricing page, there are several best practices to keep in mind to ensure an effective and user-friendly experience. Here are some pricing page design best practices:
Clear and Simple Layout:
- Keep the design clean, uncluttered, and easy to navigate.
- Use ample white space to improve readability and highlight important elements.
- Maintain a logical flow of information, guiding the user through the pricing options.
Visual Hierarchy:
- Implement a visual hierarchy to prioritize and emphasize key elements.
- Use font sizes, colors, and typography to distinguish headings, pricing details, and calls-to-action.
- Make sure the most important information, such as pricing plans and features, stands out prominently.
Highlighted Pricing Options:
- Display pricing plans or tiers in a visually distinct manner, such as using boxes or columns.
- Use color or visual cues to differentiate between different pricing options.
- Clearly label each plan to avoid confusion and make it easy for users to compare.
Features and Benefits:
- Clearly outline the features and benefits associated with each pricing plan.
- Use bullet points or icons to make the information scannable and digestible.
- Highlight the unique or standout features that differentiate each plan.
Visual Representation:
- Utilize visual elements, such as icons or images, to represent features or benefits.
- Incorporate graphical elements or charts to illustrate the value provided by each plan.
- Use visual cues to draw attention to important details, such as popular or recommended plans.
Call-to-Action Buttons:
- Place prominent and visually appealing call-to-action buttons for each pricing plan.
- Use action-oriented language that encourages users to take the desired action, such as "Get Started" or "Sign Up Now."
- Ensure the buttons are easily clickable and stand out from other elements on the page.
Mobile-Friendly Design:
- Optimize the pricing page for mobile devices to accommodate users on smartphones or tablets.
- Ensure the page layout is responsive and adjusts to different screen sizes.
- Use a mobile-first approach to prioritize essential information and maintain a smooth user experience.
Trust Indicators and Security:
- Display trust badges or security icons to assure users of secure payment processing.
- Clearly communicate the security measures in place to protect customer data.
- Include links to privacy policies or terms of service to enhance transparency.
A/B Testing and Analytics:
- Conduct A/B testing to experiment with different design elements and layouts.
- Use analytics tools to track user behavior and conversions on the pricing page.
- Continuously analyze the data and make data-driven improvements based on user preferences and engagement.
By following these pricing page design best practices, you can create a visually appealing, user-friendly, and persuasive pricing page that effectively communicates the value of your offerings and encourages conversions.
A Comprehensive Guide to Creating Effective Pricing Pages with HubSpot CMS
To create a pricing page using HubSpot CMS, follow these step-by-step instructions:
-
Access HubSpot CMS: Log in to your HubSpot account and navigate to the CMS Hub or Marketing Hub, depending on your subscription plan.
-
Navigate to Website Pages: In the HubSpot dashboard, click on "Marketing" or "Website" in the top navigation menu. Then, select "Website Pages" from the dropdown menu.
-
Create a New Page: Click on the "Create" button to start creating a new page. Choose the appropriate template for your pricing page or select a blank template to build it from scratch.
-
Design the Layout: Customize the layout of your pricing page using the drag-and-drop interface. You can add sections, columns, and modules to structure the page. Consider including a header section, pricing tables, feature sections, and a call-to-action section.
-
Add Pricing Tables: If you want to display pricing options on your page, you can use the HubSpot Pricing Table module. Drag the Pricing Table module to the desired section of your page. Configure the table by adding different pricing tiers, features, descriptions, and buttons. Customize the styling and formatting options to match your brand.
-
Integrate Pricing Information: If you have pricing data in your HubSpot CRM or pricing software, you can integrate it into your pricing page. This allows you to dynamically populate the pricing information on the page. Consult HubSpot's documentation or seek assistance from their support team to set up the integration.
-
Customize Content and Images: Update the content and images on your pricing page to align with your offerings and branding. Replace placeholder text with your pricing plan details, descriptions, and any other relevant information. Upload high-quality images to enhance the visual appeal of the page.
-
Include Call-to-Action Buttons: Strategically place call-to-action buttons throughout the pricing page to encourage visitors to take the desired action, such as signing up for a plan or contacting sales. Customize the buttons' text, style, and destination URLs to align with your conversion goals.
-
Optimize for Mobile: Ensure that your pricing page is mobile-friendly. HubSpot CMS automatically adjusts the layout for different screen sizes, but review and test the page on various devices to ensure a seamless experience. Pay attention to font sizes, button sizes, and overall responsiveness.
-
Preview and Publish: Before publishing your pricing page, use the preview feature to review how it looks and functions. Make any necessary adjustments or corrections. Once you are satisfied, click the "Publish" button to make your pricing page live on your website.
Remember to regularly review and update your pricing page as your offerings and pricing change. Monitor its performance and make improvements based on user feedback and data analytics to optimize conversions and user experience.
Mastering Design Strategies for Conversion and User Engagement
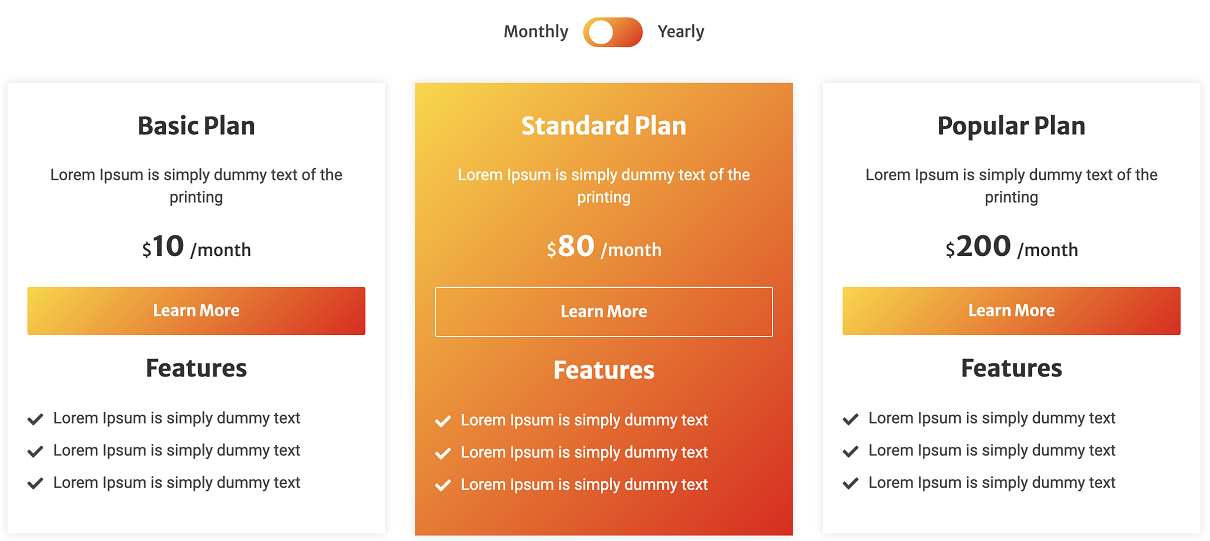
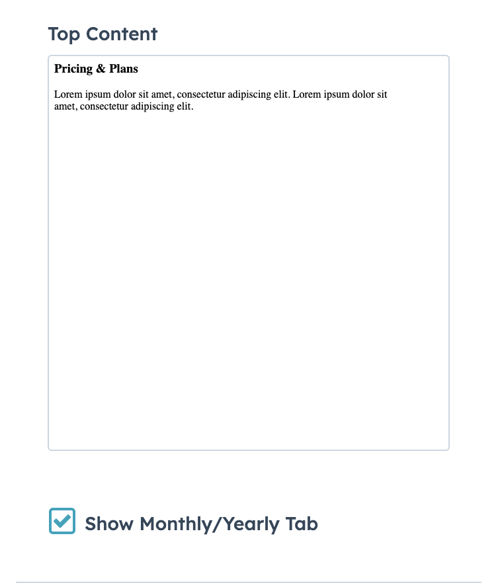
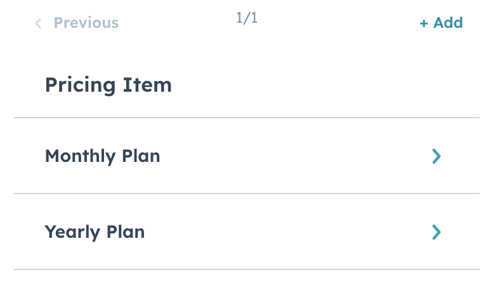
Show monthly/yearly tab
In a pricing module, the monthly/yearly tab is typically used to allow users to toggle between viewing the pricing plans on a monthly or annual basis. Here's a textual description of how it can be implemented:
The pricing module is divided into two sections, with the first section displaying the pricing plans for the monthly billing option, and the second section showing the pricing plans for the yearly billing option.
At the top of the pricing module, there are two tabs labeled "Monthly" and "Yearly" that users can click on to switch between the billing options. The active tab is highlighted to indicate the currently selected billing frequency.
Below the tabs, the pricing plans are presented in a grid or table format. Each plan is represented by a column, with the plan name displayed at the top. The features and benefits associated with each plan are listed below.
For the monthly billing section, the pricing details, such as the cost per month, are prominently displayed beneath the plan features. Users can easily compare the monthly prices of different plans side by side.
Similarly, in the yearly billing section, the pricing details for the annual subscription are shown beneath the plan features. The cost per year is typically presented along with the equivalent monthly cost, providing users with a clear understanding of the savings they can achieve by choosing the yearly option.
To make the pricing module more visually appealing, it may include icons or illustrations next to the plan features and benefits. These visuals can help convey the value of each plan and make the pricing options more enticing.
In both the monthly and yearly sections, there are call-to-action buttons or links associated with each plan, allowing users to easily proceed with their chosen billing option.
By incorporating the monthly/yearly tabs into the pricing module, users can effortlessly switch between billing frequencies and make informed decisions based on their preferences and budget.
Effective Column Types for Various Pricing Options
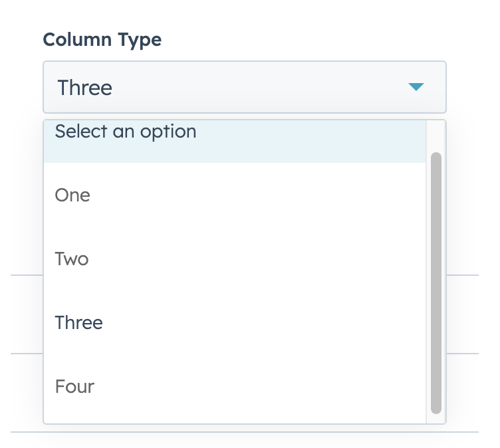
In pricing tables, you can choose to use different numbers of columns based on your pricing options and the amount of information you want to convey. Here are the common column types used in pricing tables with one, two, three, and four columns:
One Column Pricing Table:
- Plan Name: Displays the name or label of the pricing plan.
- Features and Benefits: Provides a description of the key features and benefits included in the plan.
- Pricing Details: Presents the pricing information, such as the cost per month or per year, for the plan.
- Call-to-Action: Includes a button or link to prompt users to take action, such as "Sign Up" or "Get Started."
Two Column Pricing Table:
- Plan Name: Displays the name or label of the pricing plan.
- Features and Benefits: Provides a description of the key features and benefits included in the plan.
- Pricing Details: Presents the pricing information, such as the cost per month or per year, for the plan.
- Call-to-Action: Includes a button or link to prompt users to take action, such as "Sign Up" or "Get Started."
Three Column Pricing Table:
- Plan Name: Displays the name or label of the pricing plan.
- Features: Lists the key features included in the plan.
- Pricing Details: Presents the pricing information, such as the cost per month or per year, for the plan.
- Call-to-Action: Includes a button or link to prompt users to take action, such as "Sign Up" or "Get Started."
Four Column Pricing Table:
- Plan Name: Displays the name or label of the pricing plan.
- Features: Lists the key features included in the plan.
- Pricing Details: Presents the pricing information, such as the cost per month or per year, for the plan.
- Benefits: Highlights the specific benefits or advantages customers will gain by choosing the plan.
- Call-to-Action: Includes a button or link to prompt users to take action, such as "Sign Up" or "Get Started."
These column types provide a basic structure for organizing the information in your pricing table. However, depending on your specific needs, you can customize the column types and their order to best represent your pricing options and highlight the key selling points of each plan.
Monthly and Yearly Plans to Suit Your Preferences
Monthly Plan: Our Monthly Plan offers you the flexibility of paying on a month-to-month basis. With this plan, you can enjoy our services without a long-term commitment. It's perfect for those who prefer a short-term subscription or want to test our services before committing to a longer period. You'll have access to all the features and benefits our platform offers for the duration of your subscription month.
Yearly Plan: Our Yearly Plan provides you with significant savings and added convenience. By opting for an annual subscription, you'll enjoy a discounted rate compared to our monthly plan. This option is ideal for those who are committed to using our services long-term and want to maximize their cost savings. With the Yearly Plan, you'll have uninterrupted access to all features and benefits for the entire year.
Regardless of the plan you choose, we are committed to delivering exceptional value and ensuring your satisfaction. Whether you prefer the flexibility of the Monthly Plan or the cost savings of the Yearly Plan, we have options that cater to your needs. Select the plan that aligns with your goals and get started today!
Find the Perfect Fit in Our Pricing Module
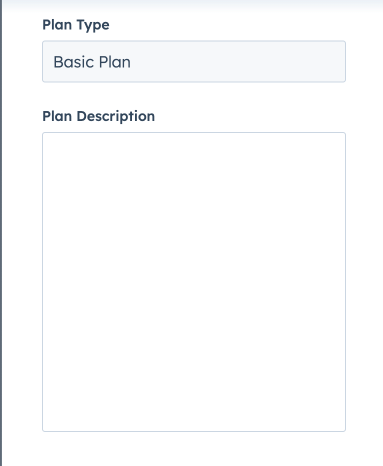
Our pricing module offers a range of plan types to cater to your unique needs and requirements. We understand that every individual or business has different preferences, usage patterns, and budget considerations. That's why we provide multiple plan options to ensure you can find the perfect fit.
-
Basic Plan: Our Basic Plan is designed for those who are just getting started or have minimal requirements. It offers essential features and functionalities at an affordable price point, allowing you to access our core offerings without breaking the bank.
-
Standard Plan: The Standard Plan is our most popular option, striking a balance between affordability and enhanced capabilities. With this plan, you gain access to a wider range of features, increased usage limits, and additional benefits that cater to a growing business or individual needs.
-
Premium Plan: For those seeking advanced features, extensive functionality, and priority support, our Premium Plan is the ideal choice. This plan unlocks a comprehensive suite of tools and resources to help you achieve your goals and stay ahead of the competition.
-
Custom Plan: We understand that your needs may go beyond our standard plans. That's why we offer a Custom Plan option, allowing you to build a personalized pricing package tailored precisely to your unique needs. Our team works closely with you to determine the features, resources, and pricing structure that aligns with your goals.
No matter which plan type you choose, our pricing module ensures transparency, flexibility, and value for your investment. We believe in empowering you with the right options to make an informed decision that best suits your needs.
Understanding Price, Currency, and Suffix in the Pricing Module
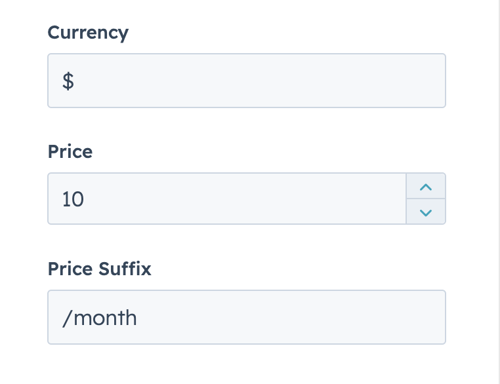
In a pricing module, the price, currency, and suffix play important roles in conveying the cost of your offerings effectively. Here's a breakdown of each element:
-
Price: The price refers to the numerical value associated with a particular pricing plan or option. It represents the cost that customers need to pay to access your product or service. The price should be displayed prominently and clearly to ensure transparency and easy comprehension for your customers.
-
Currency: The currency symbol represents the monetary unit in which your prices are denoted. It is important to display the currency symbol alongside the price to provide clarity and avoid any confusion regarding the currency being used. Common currency symbols include "$" for US dollars, "€" for euros, "£" for British pounds, and "¥" for Japanese yen.
-
Suffix: The suffix is an optional element that can be added after the price to provide additional context or information. It typically appears after the numerical value and currency symbol. The suffix may include terms like "per month," "per year," "per user," "per seat," or any other relevant unit of measurement that helps customers understand the pricing structure and terms.
When designing your pricing module, ensure that the price, currency symbol, and suffix are visually aligned and clearly presented. Consistency in formatting and placement will enhance the user experience and make it easier for customers to compare prices across different plans or options. It's also important to use appropriate localization for currency symbols based on your target audience.
By effectively displaying the price, currency, and suffix in your pricing module, you provide transparency and facilitate a smooth purchasing decision for your customers.
Key Features in Our Pricing Module
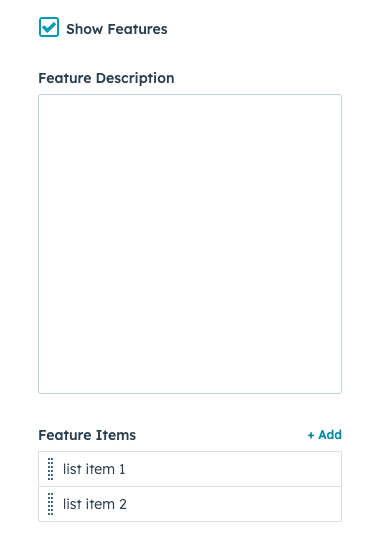
In a pricing module, features refer to the specific functionalities and capabilities that are included in each pricing plan or option. These features help customers understand what they will receive when they choose a particular pricing tier. Here are some common features that you can include in your pricing module:
-
Describe the first standout feature that your product or service offers. Explain how it solves a problem or fulfills a customer need. Highlight the unique value it brings and why it sets your offering apart from competitors.
-
Highlight another significant feature that enhances the customer experience or provides added functionality. Explain how it improves efficiency, streamlines processes, or delivers additional benefits. Emphasize the value customers will gain from this feature.
-
Present a feature that showcases customization or personalization options. Describe how customers can tailor the product or service to meet their specific requirements. Highlight the flexibility and adaptability this feature offers.
-
Outline a feature that promotes collaboration or teamwork. Explain how it facilitates communication, file sharing, or project management among team members or external stakeholders. Emphasize the benefits of this collaborative feature.
-
Showcase a feature that enhances security or data protection. Explain how it ensures the privacy and integrity of customer data. Highlight any encryption, authentication, or compliance measures in place to safeguard sensitive information.
-
Describe a feature that provides comprehensive analytics or reporting capabilities. Explain how it enables customers to track performance, gain insights, and make data-driven decisions. Highlight the actionable information that can be derived from this feature.
-
Present a feature that offers excellent customer support or dedicated account management. Describe how customers can access assistance, whether through live chat, phone support, or a dedicated account manager. Highlight the responsiveness and availability of your support team.
-
Outline a feature that showcases integration with other platforms or tools. Explain how it enables seamless connectivity and enhances workflows. Highlight any integrations with popular software or services that your customers might already be using.
Remember to tailor the features to the unique aspects of your product or service. Clearly articulate the benefits and advantages of each feature to help potential customers understand the value they will receive from selecting a specific pricing plan.
By highlighting the features in your pricing module, you provide transparency and demonstrate the capabilities of your product or service, helping customers make informed decisions based on their specific needs and requirements.
Unveiling the Role of Buttons in Pricing Modules
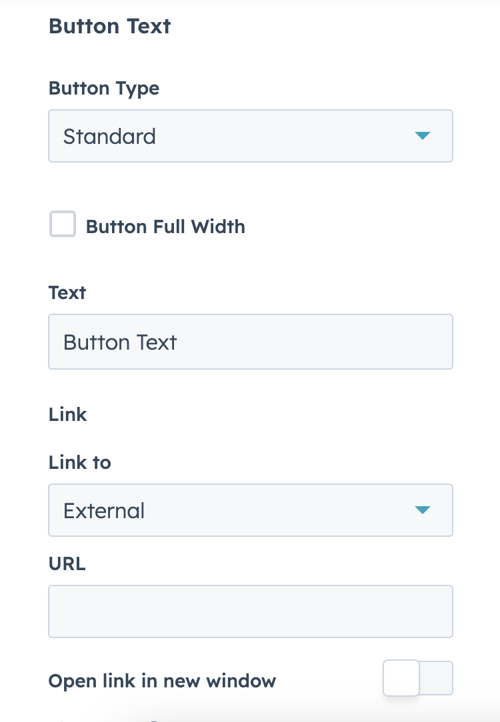
In a pricing module, the effective use of buttons can greatly impact user experience and conversion rates. Let's explore the characteristics and roles of standard buttons and call-to-action (CTA) buttons within the pricing module:
Standard Button: The standard button serves as an informative element that provides users with additional options or details related to pricing plans. Here are its key characteristics:
- Design: The standard button is typically designed to blend harmoniously with the overall aesthetic of the pricing module. It may feature a less prominent color or a simpler appearance compared to the CTA button, ensuring it does not distract from the primary action.
- Wording: The text on a standard button is descriptive and informative, reflecting the action or destination it leads to. Labels such as "Compare Plans," "View Details," or "Learn More" are commonly used to convey the purpose of the button accurately.
- Placement: Standard buttons are strategically placed alongside specific features or plan descriptions, providing users with additional information or alternative paths to explore. This placement helps users make informed decisions by considering various options.
- Functionality: Clicking on a standard button may trigger actions such as revealing more detailed information in a modal or popover, or directing users to a separate page for in-depth plan comparisons or feature details.
Call-to-Action (CTA) Button: The call-to-action button plays a crucial role in driving conversions and guiding users towards the primary action, such as selecting a pricing plan or making a purchase. Here are its key characteristics:
- Design: The CTA button is designed to stand out prominently on the pricing module, using colors, size, and styling that distinguish it from other elements. Its visual prominence grabs the user's attention and compels them to take action.
- Wording: The text on a CTA button is action-oriented and persuasive, using phrases like "Get Started," "Sign Up Now," or "Subscribe Today." The wording aims to create a sense of urgency and motivate users to take the desired action immediately.
- Placement: The CTA button is strategically positioned within each pricing plan or at the end of the pricing table to ensure its visibility and accessibility. Placing it where users naturally expect to find it helps streamline the conversion process.
- Functionality: Clicking on the CTA button initiates the primary action, such as selecting a plan and proceeding to the checkout or sign-up process. It serves as the gateway to the next step in the user's journey, guiding them smoothly through the conversion funnel.
- Conversion Optimization: The design, wording, and placement of the CTA button are often fine-tuned through A/B testing to maximize conversion rates. This iterative process involves experimenting with different button colors, text variations, and placement options to determine the most effective configuration for driving conversions.
By incorporating both standard buttons for additional information and call-to-action buttons for primary actions, you can provide users with a comprehensive pricing experience that caters to their needs and encourages them to take the desired actions.
Choose "Our Popular Plan" option in the Pricing Module
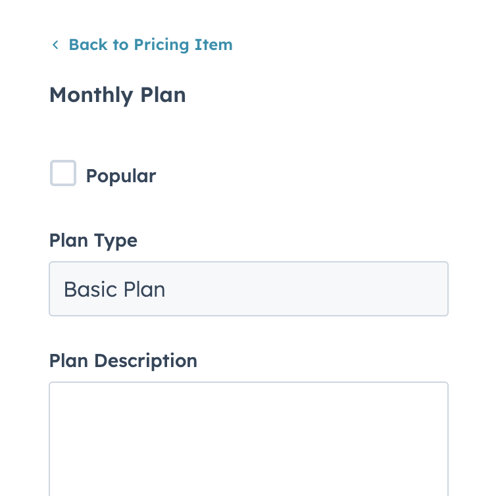
Our popular plan option in the pricing module is designed to provide exceptional value and meet the needs of a wide range of customers. Here are the key features and benefits of our popular plan:
-
Comprehensive Features: The popular plan encompasses a comprehensive set of features that cater to the diverse requirements of our customers. From essential functionalities to advanced capabilities, this plan offers a well-rounded solution that addresses various use cases.
-
Optimal Pricing: We have carefully crafted the pricing of our popular plan to strike a balance between affordability and value. It offers an attractive pricing point that ensures you receive a robust set of features without breaking your budget.
-
Increased Limits and Resources: With our popular plan, you enjoy increased limits and resources compared to lower-tier plans. This means you have ample capacity to accommodate your growing needs, whether it's in terms of storage space, bandwidth, or user accounts.
-
Priority Support: We understand the importance of timely and efficient support. That's why our popular plan comes with priority support, ensuring that your inquiries and issues are given top priority by our dedicated support team. You can expect prompt responses and personalized assistance whenever you need it.
-
Exclusive Benefits: As a subscriber to our popular plan, you gain access to exclusive benefits reserved only for our valued customers. This may include early access to new features, special promotions, or invitations to exclusive events and webinars.
-
Trusted by Many: Our popular plan has earned the trust and satisfaction of a large number of customers. It has consistently garnered positive reviews and feedback, highlighting its reliability, performance, and overall value for money.
To select our popular plan, simply click on the corresponding option within the pricing module. You'll be guided through the subscription process, and once you've successfully subscribed, you can immediately start enjoying the benefits and features exclusive to our popular plan.
Please keep in mind that while our popular plan is highly recommended and favored by many, it's essential to assess your specific needs and requirements to ensure that it aligns perfectly with your business objectives. We encourage you to explore our pricing options and carefully evaluate which plan best suits your unique circumstances.
By selecting our popular plan, you're making a choice that unlocks exceptional value, comprehensive features, and a wealth of benefits that have made it the preferred option for many of our satisfied customers.
Elevate Your Pricing Table with Stunning Style and Design
When it comes to designing a pricing table, the style plays a crucial role in capturing the attention of users and enhancing their overall experience. The visual aesthetics of the pricing table can influence how users perceive your pricing options and ultimately impact their decision-making process. Here are some key elements to consider when it comes to the style of your pricing table:
-
Color Scheme: The color scheme of your pricing table should align with your brand identity and evoke a sense of professionalism and trust. Choose a color palette that is visually appealing, harmonious, and complements your overall website design. Consider using colors strategically to highlight key elements such as pricing tiers, features, and call-to-action buttons.
-
Typography: Selecting the right typography can greatly enhance the readability and visual appeal of your pricing table. Use clear and legible fonts that are consistent with your brand style. Ensure that the font size is appropriate, making it easy for users to scan and compare the pricing information without straining their eyes.
-
Icons and Graphics: Incorporating icons and graphics in your pricing table can help visually represent key features or benefits of each pricing tier. Icons can make the information more scannable and intuitive for users, enabling them to quickly grasp the value offered by each plan. Ensure that the icons are consistent in style and aligned with your overall branding.
-
Layout and Structure: The layout of your pricing table should be well-organized and easy to navigate. Arrange the pricing tiers in a logical order, such as from basic to premium, and ensure that the information flows naturally from left to right or top to bottom. Use appropriate spacing and alignment to create a visually balanced and aesthetically pleasing structure.
-
Visual Hierarchy: Implement a clear visual hierarchy to draw attention to the most important elements in your pricing table. Highlight the pricing tiers or packages you want to promote, such as a "Popular" or "Recommended" plan, using visual cues such as color, size, or badges. Emphasize the key features and benefits of each plan to help users make informed decisions.
-
Responsive Design: Ensure that your pricing table is responsive and adapts well to different screen sizes and devices. With an increasing number of users accessing websites from mobile devices, it is crucial to provide a seamless and optimized experience across various platforms.
By paying attention to the style of your pricing table, you can create a visually appealing and engaging experience for your users. Remember to strike a balance between aesthetics and functionality, ensuring that the design elements enhance the readability, clarity, and usability of the pricing information. With a well-designed and visually pleasing pricing table, you can effectively communicate the value of your offerings and drive conversions.
References:
- Team Logic hubspot cms theme
- Sky media agency hubspot cms theme
- Dream home hubspot cms theme
- Ladder hubspot cms theme
- Healthcare hubspot cms theme
- Cloud host hubspot cms theme
- Mental mantra hubspot cms theme
- Digital plex hubspot cms theme
- Bignetwork hubspot cms theme
- Hostingable hubspot cms theme
Conclusion:
A well-designed pricing page is a powerful tool for driving conversions and revenue for your business. By understanding your target audience, choosing the right pricing model, and effectively communicating your value proposition, you can create a pricing page that entices visitors to become paying customers. Remember to keep the pricing simple and transparent, optimize for mobile, and continuously test and iterate to maximize its effectiveness. With these best practices in mind, you can create a compelling pricing page that contributes to the growth and success of your business.
Related Post
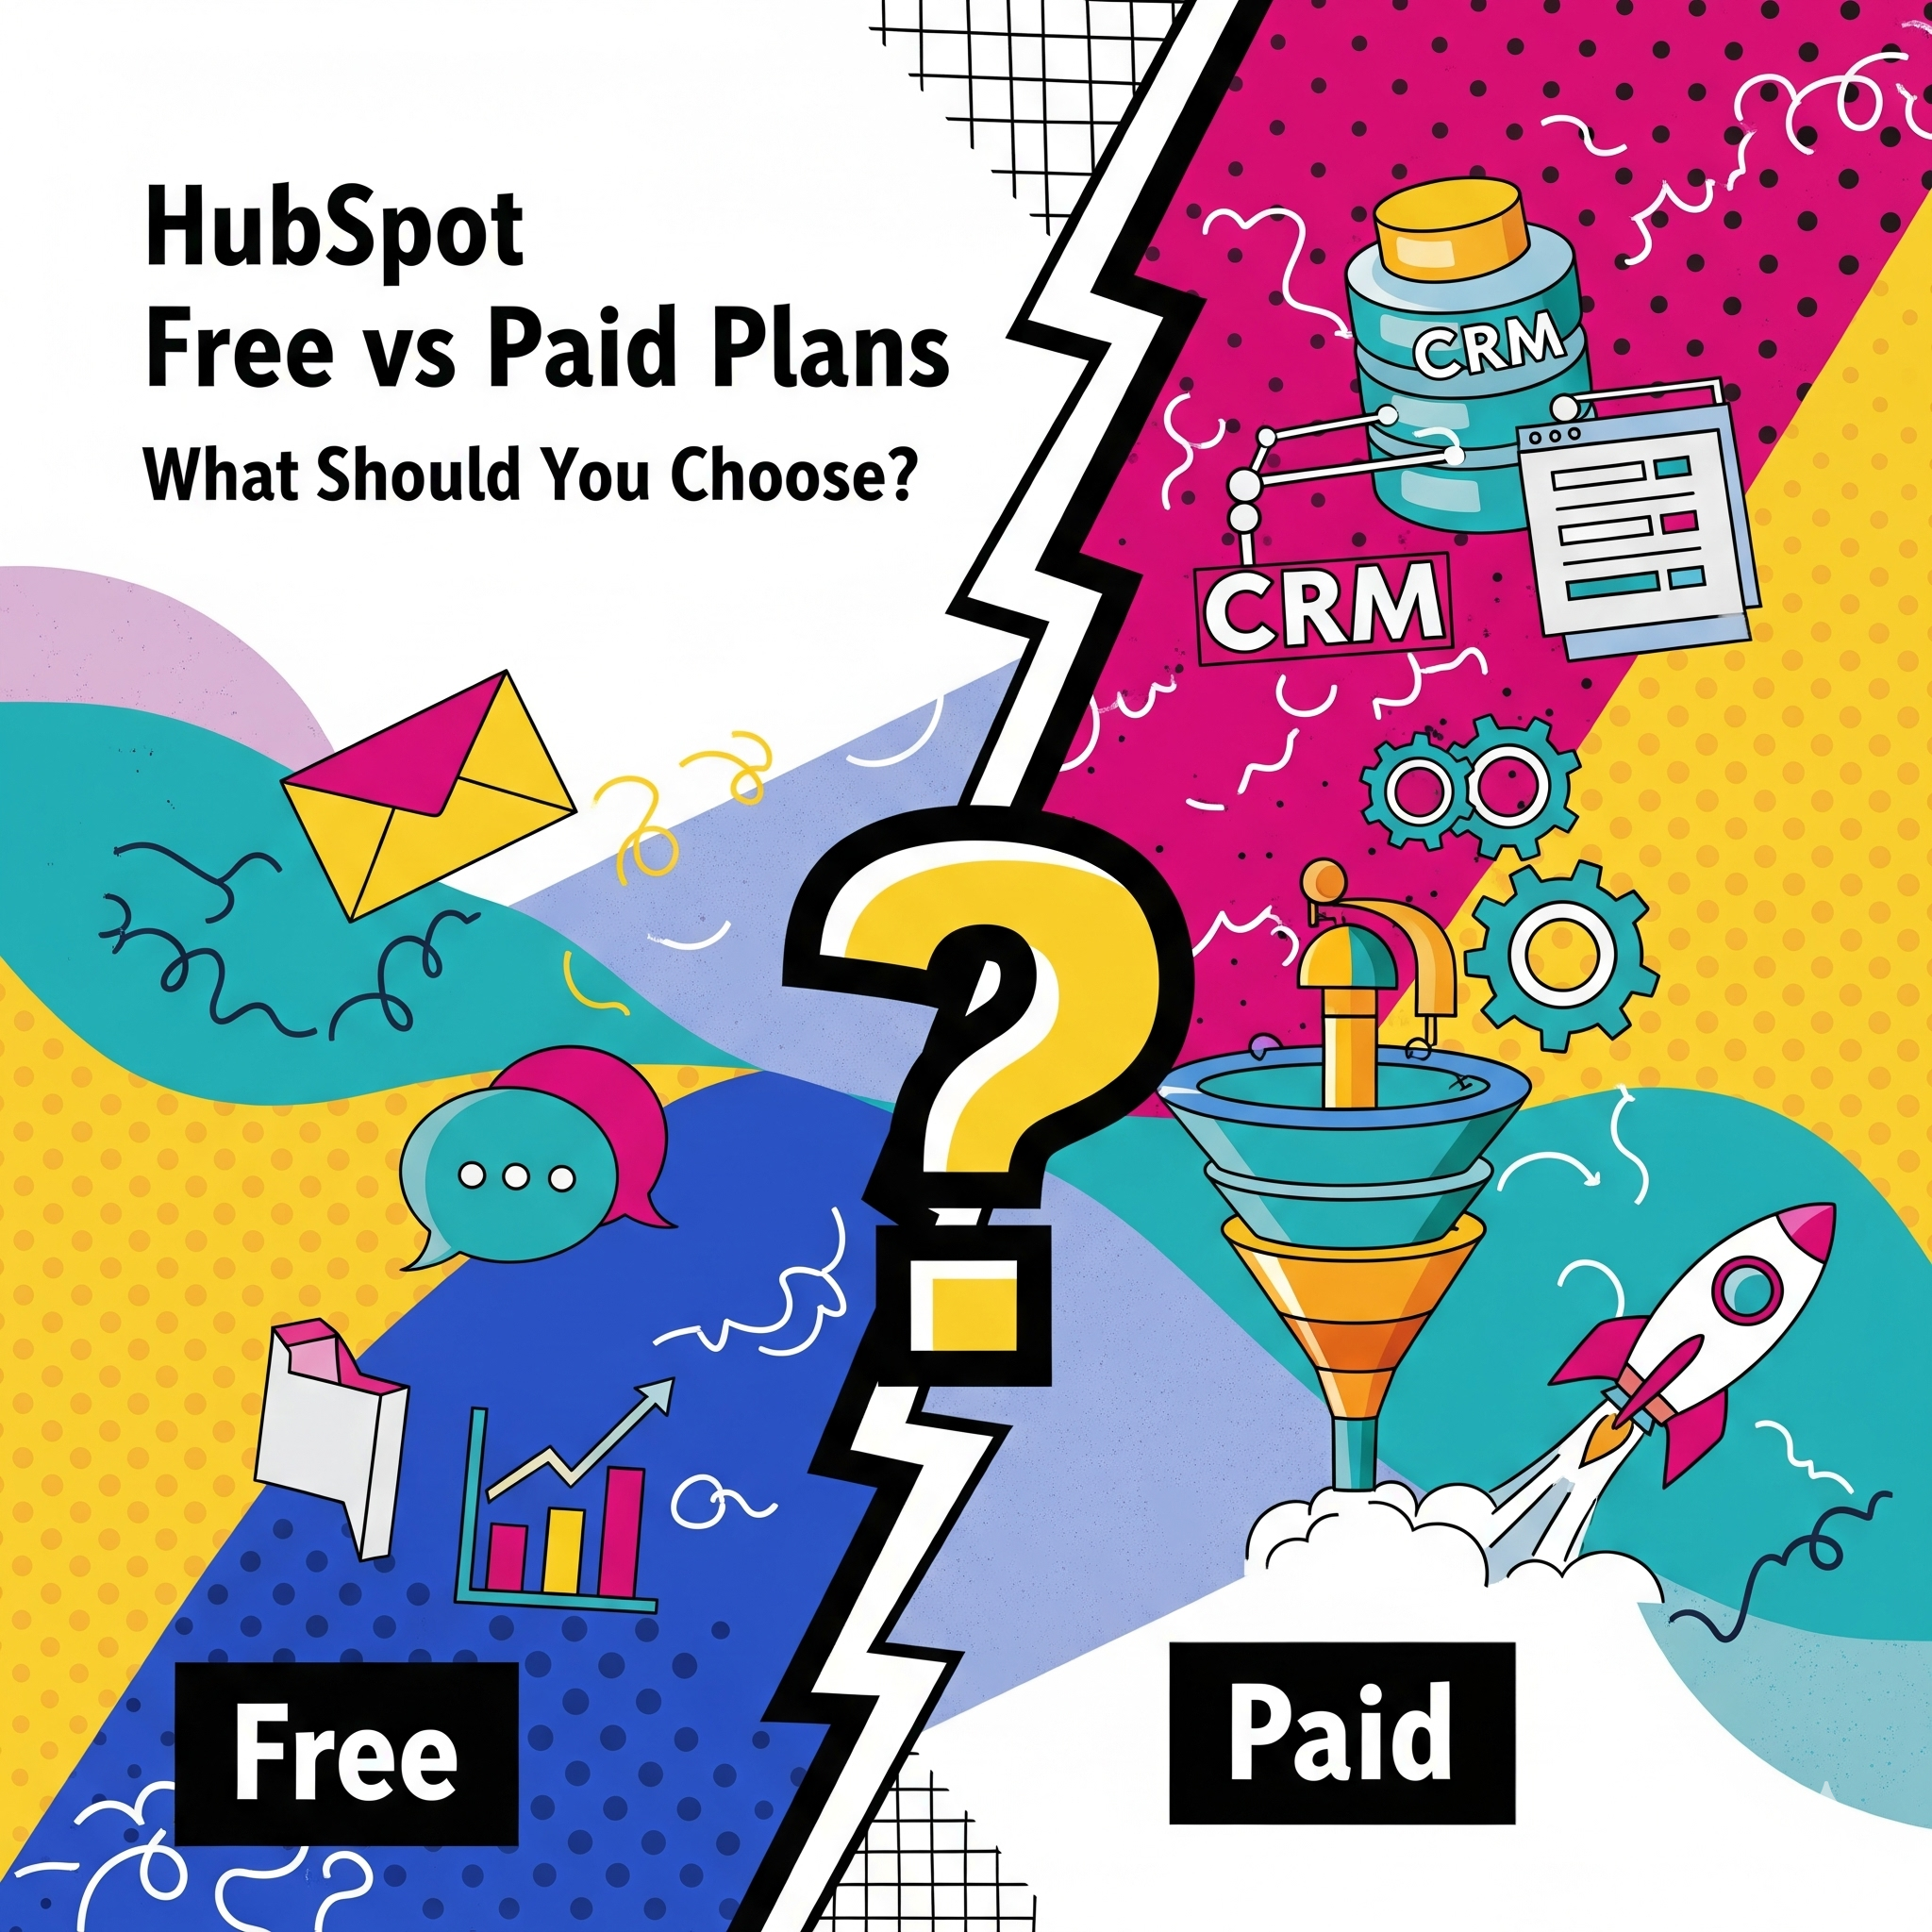
HubSpot Free vs Paid Plans: 2026 Complete Comparison Guide
Introduction HubSpot is one of the few CRM and marketing platforms that offers a generous free plan alongside a suite of powerful paid tools. But the question most teams face is:

HubSpot Content Hub Pricing in India: 2026 Plans, INR Costs & GST Guide
Introduction Page speed in 2026 isn't just about user experience — it's measurable, ranking-relevant, and revenue-impacting. Google's algorithm now factors Core Web Vitals into search ranking, and faster sites consistently outperform slower...
How Custom Websites and HubSpot Help Tailor Your Marketing
Marketing strategies must be carefully crafted to stand out and resonate with target audiences. One of the pivotal components of any effective marketing strategy is the landing page. When paired with the right tools, such as custom websites and...
Power Up Your Project
Request a Quote and Let Us Save the Day!

Leave a reply